
I have an imaging system that uses the command line imagex to build and apply images to install new computers. It’s relatively easy to set up and works quite efficiently. Because it’s using Microsoft’s own Windows Image Files (WIM) format, it’s also easy to mount to not only read but update files in the image file. You can even install additional drivers to avoid installing them after you apply the image to a new computer that comes with new hardware.
To read a WIM image file content
If you just need to read the content of a WIM file, you can simply use a tool called 7-zip. Right-click the WIM file, choose 7-Zip from the context menu and choose Open Archive.
A new File Explorer window opens up where you can navigate through the folders and files contained inside the WIM file. You will be able to only read but not make any changes to it though.
To mount a WIM file
If you need to make change to a WIM file, you will need to mount it properly on Windows using DISM, a command line that enumerates, installs, uninstalls, configures, and updates features and packages in Windows images.
Open an elevated command prompt window, and run the following command:
DISM /Mount-Wim /WimFile:"filename.wim" /index:1 /MountDir:"c:\temp"
Make sure the mounted directory is empty and has nothing in it, as the image will be mounted to that folder that you can browse through with File Explorer.

To add a driver to a mounted WIM image
Based on the type of driver you have, you can add a driver from a specific driver INF file, like:
DISM /Image:"c:\temp" /Add-Driver /Driver:"driver.inf"
Or from a folder:
DISM /Image:"c:\temp" /Add-Driver /Driver:"video-driver-folder"
Or add a bunch of drivers from a folder and all its sub-folders:
DISM /Image:"c:\temp" /Add-Driver /Driver:"driver-folder" /recurse

To apply Windows updates
After the WIM image is mounted, using the following command to inject the updates to the image.
DISM /image:"c:\temp" /Add-Package /PackagePath:"C:\Updates\"
To unmount the WIM file
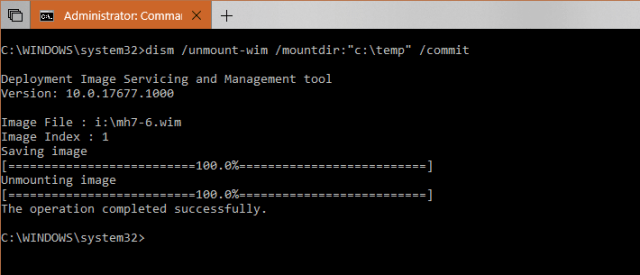
Once you are done all the changes, you can unmount the WIM file with or without committing the changes to the file. Make sure you close File Explorer you use to browse through the image content to avoid any files being locked up during the unmounting process.
To discard the change:
DISM /unmount-Wim /MountDir:"c:\temp" /discard
To commit the change:
DISM /unmount-wim /MountDir:"c:\temp" /commit
How about after unmount and commit the change. How to deploy the new image to install Os.
You have update the image in ALL DP’S and deploy through SCCM.
doesn’t work for me. Says /commit is unsupported, error 50.
C:\WINDOWS\system32>DISM /unmount-wim /MountDir:”H:\install” /commit
Deployment Image Servicing and Management tool
Version: 10.0.19041.746
Error: 50
The request is not supported.
The DISM log file can be found at C:\WINDOWS\Logs\DISM\dism.log
Never mind this was operator error. Wrong path name given.
Never mind this was operator error. Wrong path given.